RIGHT
HAND (FINGER PICKING) TECHNIQUE
One of the first things I do with new students, regardless of their
experience level, is to sit them down and analyze how their hands are
working together on the bass. In many cases, the student has gone about
as far as they can go given their current approach, because they are
limited by a particular technical stumbling block. To get them working
at the next level usually only requires some fine-tuning. Over the years,
I have come to recognize some common problems and solutions with respect
to hand technique, and we will address them in the articles that follow.
When working to improve hand technique, sometimes it is a good idea
to focus on each hand individually. Each hand plays a different role
in playing the bass; therefore, each hand requires a unique technical
approach. First, we will address right hand (picking) technique as it
applies to finger style playing. In this article I will focus on some
important concepts specific to the right hand that often cause problems
for bass players.
Muting Methods
It is a good idea to utilize some sort of muting method to keep strings
quiet that are not being played. This topic causes a lot of problems
for players, especially ones who are making the transition from 4 string
bass to a 5 or 6 string. Keeping the strings that aren't being played
quiet is a challenge for the right hand because it is already preoccupied
with the actual plucking of the strings. Many players try to depend
on their left hand exclusively for muting tasks, but this approach can
be futile during very complex or challenging passages.
In my opinion, the use of a "moveable anchor" is one of the
most versatile and least restrictive solutions to this challenge. Most
of us who play finger style already utilize some type of anchored approach
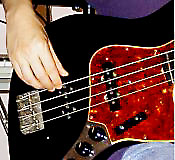
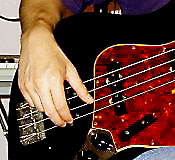
using the thumb of the right hand. For example, some players place their
thumb on a pickup or the body of the bass while they play in order to
stabilize their right hand. (figure 1)
figure 1

Others might use a thumb rest or low string to accomplish the same task.
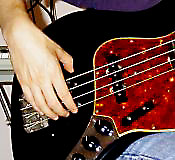
The concept of a movable anchor is similar, but instead of leaving the
thumb in one place, this approach allows the thumb to 'follow' the picking
fingers back and forth over the width of the strings, acting as a mute
in both directions.
An exaggerated example of this approach for 4 string bass is demonstrated
in the following exercise (figure 2):
figure 2
Top
Hand
positions are illustrated in figure 3a, 3b, 3c, and 3d:
figure 3a
3b
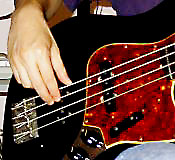
3c
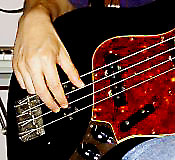
Top
3d
A summary of the basic approach is this: As your picking fingers move
across the strings, your thumb follows behind them, anchoring on those
strings not being played and keeping them quiet. Let me state once again,
however, that the previous exercise is an exaggerated example designed
to show you the basic concept. The most practical applications of this
concept allow the thumb to "float" across the strings more,
as opposed to rigidly parking on each string until you move to the next
one. There are several ways to implement this approach by simply changing
the angle of the thumb; you'll want to experiment to discover which
method works best for you. Over the years I've come to settle on a version
in which my thumb usually stays two strings behind my picking fingers,
depending on what I'm playing.
Economy of Motion
Another benefit to using a movable anchor is that in addition to taking
care of muting tasks, it also maintains a consistent hand position as
you move across the strings. To explain this another way, the actual
'openness' of your right hand remains the same regardless of which string
you are playing. You'll find that the more closed hand position used
by this approach usually results in a greater comfort. Why? Try this
test: Completely relax your hands and watch what your fingers do...
If you're built like most people, you'll find that they naturally curve
into a more closed hand position. It actually takes a degree of strength
to hold your hands completely open. Now think about how that applies
to your right hand technique. With a stationary anchor, your right hand
becomes more open the farther away your picking fingers get from your
anchor. (figure 4)
figure 4
 *
*
Top
A
moveable anchor promotes a more closed right hand position across all
strings, since you don't have to 'reach' for the higher pitched strings.
Alternation
Another approach that will help to refine your right hand technique
is the use of alternation in your picking fingers. Alternation is important
because it splits up your right hand workload amongst your picking fingers,
thereby making your picking more efficient. Regardless of whether you
use two, three, four (or more!) picking fingers, alternation is a key
concept that will help you to be more proficient. When you practice
your alternation, try to avoid "raking" as you move from higher
pitched strings to lower. Raking is when you "brush" from
the last note played on a higher string to the first note played of
the next lowest string, resulting in the same finger being used to play
both notes. Although raking is a useful technique, try not to use it
at all when you are working exclusively on your alternation. This way
you will develop full independent control over both techniques, and
subsequently choose the best method for the job in various performance
situations.
Practicing using permutations
One great way to develop your right hand is to practice exercises that
involve moving across the strings while utilizing disciplined alternation.
A very simple approach that can be developed further into more complex
examples involves the use of left hand fingering permutations. Using
a one finger per fret approach in a closed position, we will play through
every combination of your left hand fingering while moving across the
strings in both directions. To play the notes with the right hand, we
will incorporate both good alternation and our new movable anchor system.
For starters, let's assign the numbers 1, 2, 3 and 4 to our index, middle,
ring, and pinky fingers, respectively, so that we can reference their
individual use. Here are the possible combinations for your left hand
if we use each finger only once:
1-2-3-4 2-1-3-4 3-1-2-4 4-1-2-3
1-2-4-3 2-1-4-3 3-1-4-2 4-1-3-2
1-3-2-4 2-3-1-4 3-2-1-4 4-2-1-3
1-3-4-2 2-3-4-1 3-2-4-1 4-2-3-1
1-4-2-3 2-4-1-3 3-4-1-2 4-3-1-2
1-4-3-2 2-4-3-1 3-4-2-1 4-3-2-1
Now place your left hand at a median location on your neck, for example,
in 5th position. (5th position is where your first finger is lined up
with your 5th fret.) Now simply lay your left hand fingers on the neck
so that you are in a one finger per fret position. Our first permutation
will be: 1-2-3-4. We've already covered how to play it in figure 1.
Keep in mind that your right hand fingering needs to alternate 1-2-1-2-1-2,
etc. without deviation until you complete the permutation across all
strings and back. (figure 5):
figure 5
Top
(As you move back across the strings from highest to lowest, make sure
to retain the same fingering.)
The next permutation, 1-2-4-3, is illustrated in figure 6:
figure 6
Continue until you have worked through all 24 examples. If you feel
confident with those, then try a cross string left hand position playing
through the same permutations. Your left hand would be positioned over
the strings using the same one finger per fret approach, but assigning
one finger to each string, instead. Two possibilities for left hand
positioning using this approach are illustrated in figures 7 and 8:
figure 7

figure 8
As you practice, it is a good idea to use some type of external clock
source, like a drum machine or metronome. Play at very slow tempos for
extended periods of time at the beginning, making sure that each note
rings out fully until the next one is played. If you are having trouble
putting both hands together at first, focus on only one hand at a time,
paying strict attention to the problem areas. Work them out one component
at a time, and then slowly bring your two hands together, playing broken
down versions of each permutation and then gradually building. For example,
don't try to play across all four strings until you can successfully
and consistently play over one.
I think you'll find that the more you refine your technique, the more
confident a player you will become. Enjoy working on these concepts,
and next time we'll cover some specifics for the left hand. Until then,
keep it bassy!
Top