PUTTING
IT ALL TOGETHER
Whenever I work with a student interested in improving their technique,
I like to utilize playing exercises that use actual musical components,
such as scales or arpeggio forms. Using this method, a player is able
to further develop his/her ear by associating the shapes played in each
exercise with a particular sound that can be used in a variety of musical
contexts. In other words, they are learning to associate a particular
visual cue with an auditory one. Most players who have been playing
for a while have already begun to develop a ëcomfort zoneí based on
familiar shapes and patterns that they have worked on in the past. However,
we cannot count on these shapes and patterns alone to expand our ability
to express ourselves on our instruments. Memorized patterns are simply
a starting point in our development as players. They are really nothing
more than structures that assist us in recalling a particular sound
that is compatible in an harmonic environment. Subsequently, if we learn
the pattern only, but donít learn its sound and function, we are only
becoming familiar with its structure on the fingerboard. Personally,
I like to think of patterns solely as ear training devices. We learn
how a particular set of notes ësoundsí or ëfeelsí as we repeat it over
and over again in exercised form.
Our freest form of musical expression on our instrument occurs when
we are not thinking mathematically about what to play, or recalling
a shape that we have memorized; instead, it happens when we finally
abandon all ëthinkingí, and allow what we are ëfeelingí to influence
the notes we choose. Obviously, this is quite an idealistic goal to
try and achieve if we donít take the time to recognize what notes or
phrasing methods accurately reflect our feelings! So, the challenge
then becomes how to connect our shapes and patterns with a spontaneous
and honest form of musical expression. The solution is very simple in
concept, but it takes a significant amount of time to master: Let
WHAT YOU HEAR guide what you play. Stated another way, it can be
summed up like this: Work at making EVERY possible combination of notes,
shapes, sounds or patterns so familiar to you that you are able to predict
the sound of any note BEFORE it is even played.
This is where our technique practice using musical components comes
into play. It is not enough to simply memorize the pattern, itself.
We need to learn the SOUND of the pattern. For example, letís say we
were going to play a one octave C major scale in an exercise, playing
the notes ascending and descending as shown in Ex. 1:
Ex. 1

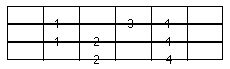
Fig. 1 shows a shape we might use to play this exercise for 4 string,
5 string, and 6 string bass:
Fig. 1
As you play Ex. 1, notice that it has a particular sound and character
to it. This is the sound of a one octave major scale, and if we were
to simply move our hand position, we could likewise play another major
scale starting on a different root note. Even though our placement and
the actual pitches played would change with our hand position, the tonality
and basic sound of the exercise would remain the same, in addition to
the pattern, itself. Now try playing Ex. 1 again, but this time try
singing along with the notes as you play them. If you have heard a major
scale played several times before, you may already be familiar with
its sound, and as a result, are already able to sing this exercise without
hearing it first. If you are not as familiar, try to memorize the actual
sound of the scale, using the exercise to help you learn the sound of
each individual note. Youíll want to work this to the point where you
can sing it or hear it in your head without the help of your instrument.
This is a very simple implementation of the concepts I had presented
earlier. From here forward, use any and all patterns you learn as ear
training exercises, as well. The more complicated the exercise, the
more challenging the ear training becomes, but it ultimately results
in a playing approach that does not sound like you are simply piecing
together several compatible patterns and exercises.
Top
Now that you know how to practice technique more effectively, letís
continue with some workouts for your hands based on a slightly more
elaborate version of our basic major scale pattern. For this lesson,
we will use a reference fingering for the Ionian mode, which is the
major scale pattern based off of its root. In order to extract as many
notes from a single hand position as possible, we are going to use a
three note per string approach for each of the following exercises.
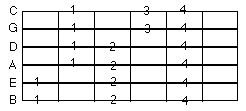
The fretting hand fingerings for these patterns on 4, 5, and 6 string
bass are labeled on each fret block diagram in Fig. 2a-2c:
Fig. 2a
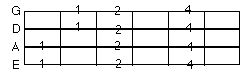
Fig. 2b
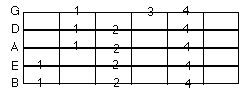
Fig. 2c
For this lesson, we will present 3 different types of exercises that
utilize this 3 note per string approach. (Each example shown is for
4 string bass, but you can apply them to 5 or 6 string bass by changing
your starting position and adding as many notes as necessary.) As you
practice each one, remember to keep your hand position and fingering
as shown in Fig. 2.
Top
1.
Ascending/Descending in a single position
This is the most basic of the exercises, but it takes on a new level
of difficulty when we follow strict 1-2 alternate picking with the plucking
hand in both directions. In this example, we start with the lowest pitched
note in the pattern (the root of the G Ionian mode) and play through
the pattern to its highest note. We then descend through the pattern
back to the root and start over again. Ex. 2 shows this exercise applied
to a 4 string bass, starting at the 3rd fret, E string. Plucking hand
fingering is provided underneath the staff. (For the fretting hand fingering,
refer to Fig. 2a-2c.)
Ex. 2

The plucking hand alternate fingering is probably the most challenging
part of this exercise. Most of us have a tendency to ërakeí the strings
on the descending portion. (Raking is when the same finger is used to
sound 2 consecutive notes.) As I had mentioned earlier in a previous
article, try not to rake at all when you are working with exercises
that call for strict alternation. This way you will develop full independent
control over both techniques and will be able to always choose the best
approach for each situation.
2. Sub grouping scale fragments in a single position
Sub grouping is when we break down a larger form or pattern into
smaller pieces that can be played or approached individually. In the
case of scale patterns, it is helpful to practice playing smaller fragments
in order to break away from a purely linear way of rehearsing, such
as shown in Ex. 2, above. Ex. 3 demonstrates a way of sub grouping the
notes in our G Ionian pattern starting with a 2 note grouping and then
increasing the size of each fragment by one note as the exercise progresses.
This continues in an ascending and descending fashion until the complete
3 note per string pattern is played ascending and descending at the
end of the exercise.
Top
Ex. 3
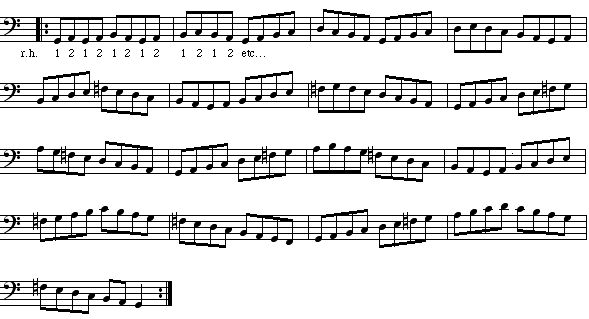
As the exercise moves along, pay close attention to the sound of
each sub grouping as they get larger and larger, until ultimately you
reach the top of the fingering pattern and then descend back down to
the root. Now put your bass down and look at this exercise again. See
if you can sing the exercise without the help of your bass. Look closely
at the shape of the exercise on the staff. Notice how the placement
of the notes on the staff visually parallels the step-wise movement
of the pitches on your fingerboard. Itís okay if you canít see this
right away. It takes some time to be able to ësight singí effectively.
But now you hopefully see how to make the connection between sight and
sound, and as a result, your practice efforts will be much more fruitful.
You will start to hear this type of scalar movement on your own as you
work through other types of shapes and exercises. As in Ex. 2, donít
ignore the plucking fingersí strict 1-2 alternation as you work through
these sub groupings!
Top
3.
String skipping in a single position
String skipping exercises involve scalar movements that do not move
across adjacent strings, as is the case with Ex. 2 and Ex. 3. Instead,
they require us to make jumps across wider string distances with both
the fretting and plucking hands. This approach presents its own set
of challenges, however. For example, it is harder to deal with plucking
hand string muting when the hand is busy ëhoppingí across the strings.
The best way I have found to deal with this problem is to utilize a
movable anchor with the plucking hand. (You can get more information
on this if you will refer to my August, 2001 article.) You will also
find that it is slightly more difficult to achieve consistency in tone
when your plucking hand is having to reach farther distances to pluck
certain notes. Crossing strings requires a slight change in hand position,
and you have to compensate for this change in feel. Ex. 4 demonstrates
one way of using string skipping to play through our G Ionian scale
pattern.
Ex. 4

Notice that each consecutive 3 note grouping corresponds to a single
string taken from our 4 string scale pattern in Fig. 2a. In other words,
in Ex. 4ís ascending movement we first play the 3 notes from the E string,
followed by the 3 notes from the D string, followed by the 3 notes from
the A string, and then finally the 3 notes from the G string. The descending
motion is simply the reverse. Once again, strict 1-2 alternation from
the plucking hand is of utmost importance in this exercise in order
to further develop consistent and accurate plucking hand technique.
As with all technical exercises, you want to start very slow and then
move your way up to more challenging tempos. Take care not to allow
yourself to become careless with any of the fretting hand fingerings
or plucking hand alternation. Your discipline will pay off immensely.
Also keep in mind that these 3 examples are just a tiny sample of the
countless ways in which you can expand your approach to practicing scale
patterns. If you are already familiar with the rest of the major scale
modal fingerings, you have probably already figured out that you can
apply these exercises to them, also. For the purposes of this article
I wanted to choose examples that were easy to play but also unique enough
to inspire some hybrid approaches of your own. I hope that they have
opened some doors for you and have helped to add something fresh to
your practice routine. Obviously, these approaches shouldnít end with
the major scale. You will want to expand your practice routine to include
other scales and forms in all positions on the bass neck and in all
keys. Finally, allow me to stress one more time how important it is
to sing these exercises as you learn them! Your disciplined technique
practice, combined with your attention to ear training will continue
to bring you closer and closer to mastery of your instrument.
Top